Building Your First GitHub Custom Action: A Step-by-Step Guide

Why Custom Actions Matter
If you’re using GitHub Actions for CI/CD, you’ve probably noticed yourself writing the same workflow steps over and over. Maybe you’re always checking PR sizes, validating commit messages, or posting notifications to Slack. This repetition is a perfect opportunity for a custom action.
In this guide, I’ll walk you through creating a practical GitHub Custom Action from scratch: a PR Size Checker that automatically labels pull requests based on their size and suggests splitting large PRs.
By the end of this article, you’ll understand:
The anatomy of a GitHub Action
How to build one using JavaScript
How to bundle and publish your action
Best practices for versioning and automation
What We’re Building
Our PR Size Checker will:
Calculate total lines changed in a pull request
Apply labels:
small,medium,large, orextra-largeAutomatically create these labels if they don’t exist
Comment on oversized PRs suggesting they be split
Be configurable with custom thresholds
This solves a real problem: large PRs slow down code reviews and increase the chance of bugs slipping through. Automated labeling helps teams prioritize reviews and encourages better practices.
Prerequisites
Before we start, you’ll need:
Node.js 20 or higher
A GitHub account
Basic knowledge of JavaScript and GitHub Actions
A repository where you can test your action
Project Structure
Here’s what our final project will look like:
github-custom-action-examples/
├── action.yml              # Action metadata
├── index.js               # Main logic (source code)
├── dist/
│   └── index.js          # Bundled code (commit this!)
├── package.json          # Dependencies
├── package-lock.json
├── README.md
└── .github/
    └── workflows/
        ├── release.yml                # Automated releases
        └── pr-size-check.yml          # Example usage
The key thing to understand: we write code in index.js, but GitHub Actions runs dist/index.js (the bundled version). More on that later.
Step 1: Setting Up the Project
Create a new repository and initialize it:
mkdir pr-size-checker
cd pr-size-checker
npm init -y
Install the required dependencies:
npm install @actions/core @actions/github
npm install --save-dev @vercel/ncc
What are these packages?
@actions/core: Provides functions for inputs, outputs, and logging@actions/github: Gives access to GitHub API and webhook payload@vercel/ncc: Bundles your code and dependencies into a single file
Update your package.json with build scripts:
{
  "scripts": {
    "build": "ncc build index.js -o dist"
  }
}
Step 2: Creating the Action Metadata
The action.yml file is your action's configuration. It defines inputs, outputs, and how to run the action.
Create action.yml:
name: 'PR Size Checker'
description: 'Automatically checks Pull Request size and adds appropriate labels'
author: 'AutomationDojo'

branding:
  icon: 'git-pull-request'
  color: 'blue'

inputs:
  github-token:
    description: 'GitHub token for API calls'
    required: true

  small-threshold:
    description: 'Maximum lines changed for a small PR'
    required: false
    default: '100'

  medium-threshold:
    description: 'Maximum lines changed for a medium PR'
    required: false
    default: '300'

  large-threshold:
    description: 'Maximum lines changed for a large PR'
    required: false
    default: '600'

  comment-on-large:
    description: 'Whether to comment on large PRs'
    required: false
    default: 'true'

outputs:
  size-label:
    description: 'Label applied to the PR (small, medium, large, extra-large)'

  lines-changed:
    description: 'Total number of lines changed'

runs:
  using: 'node20'
  main: 'dist/index.js'
Key points:
inputs: Parameters users can configureoutputs: Values your action returns (useful for chaining actions)runs.main: Points to the bundled file, not the sourcebranding: How your action appears in the GitHub Marketplace
Step 3: Writing the Action Logic
Now for the core functionality. Create index.js:
const core = require('@actions/core');
const github = require('@actions/github');

async function run() {
  try {
    // Get inputs
    const token = core.getInput('github-token', { required: true });
    const smallThreshold = parseInt(core.getInput('small-threshold'));
    const mediumThreshold = parseInt(core.getInput('medium-threshold'));
    const largeThreshold = parseInt(core.getInput('large-threshold'));
    const commentOnLarge = core.getInput('comment-on-large') === 'true';

    // Initialize GitHub client
    const octokit = github.getOctokit(token);
    const context = github.context;

    // Ensure this is a pull request event
    if (!context.payload.pull_request) {
      core.setFailed('This action only works on pull_request events');
      return;
    }

    const pr = context.payload.pull_request;
    const owner = context.repo.owner;
    const repo = context.repo.repo;
    const prNumber = pr.number;

    // Calculate total lines changed
    const additions = pr.additions || 0;
    const deletions = pr.deletions || 0;
    const totalChanges = additions + deletions;

    core.info(`PR #${prNumber} has ${totalChanges} lines changed`);
    core.info(`Additions: ${additions}, Deletions: ${deletions}`);

    // Determine size label
    let sizeLabel;
    if (totalChanges <= smallThreshold) {
      sizeLabel = 'small';
    } else if (totalChanges <= mediumThreshold) {
      sizeLabel = 'medium';
    } else if (totalChanges <= largeThreshold) {
      sizeLabel = 'large';
    } else {
      sizeLabel = 'extra-large';
    }

    core.info(`Size determined: ${sizeLabel}`);

    // Define label configurations
    const labelConfigs = {
      'small': { color: '0e8a16', description: 'Small PR, easy to review' },
      'medium': { color: 'fbca04', description: 'Medium-sized PR' },
      'large': { color: 'e99695', description: 'Large PR, consider splitting' },
      'extra-large': { color: 'd93f0b', description: 'Very large PR, splitting recommended' }
    };

    // Ensure all size labels exist
    for (const [labelName, config] of Object.entries(labelConfigs)) {
      try {
        await octokit.rest.issues.createLabel({
          owner,
          repo,
          name: labelName,
          color: config.color,
          description: config.description
        });
        core.info(`Created label: ${labelName}`);
      } catch (error) {
        if (error.status === 422) {
          core.info(`Label ${labelName} already exists`);
        } else {
          throw error;
        }
      }
    }

    // Get current labels
    const { data: currentLabels } = await octokit.rest.issues.listLabelsOnIssue({
      owner,
      repo,
      issue_number: prNumber
    });

    // Remove old size labels
    const sizeLabels = ['small', 'medium', 'large', 'extra-large'];
    for (const label of currentLabels) {
      if (sizeLabels.includes(label.name) && label.name !== sizeLabel) {
        await octokit.rest.issues.removeLabel({
          owner,
          repo,
          issue_number: prNumber,
          name: label.name
        });
        core.info(`Removed old label: ${label.name}`);
      }
    }

    // Add new size label
    await octokit.rest.issues.addLabels({
      owner,
      repo,
      issue_number: prNumber,
      labels: [sizeLabel]
    });
    core.info(`Added label: ${sizeLabel}`);

    // Comment on large PRs
    if (commentOnLarge && (sizeLabel === 'large' || sizeLabel === 'extra-large')) {
      const commentBody = `⚠️ **Large Pull Request Detected**

This PR has **${totalChanges} lines changed**. Large PRs can be difficult to review thoroughly and may slow down the development process.

**Consider:**
- Breaking this PR into smaller, focused changes
- Each PR should ideally address a single concern
- Smaller PRs are easier to review, test, and merge

If this PR must remain large, please ensure it has:
- ✅ Comprehensive description
- ✅ Clear testing instructions
- ✅ Appropriate documentation updates`;

      // Check if we already commented
      const { data: comments } = await octokit.rest.issues.listComments({
        owner,
        repo,
        issue_number: prNumber
      });

      const botComment = comments.find(
        comment => comment.user.type === 'Bot' &&
                   comment.body.includes('Large Pull Request Detected')
      );

      if (!botComment) {
        await octokit.rest.issues.createComment({
          owner,
          repo,
          issue_number: prNumber,
          body: commentBody
        });
        core.info('Added comment suggesting PR split');
      } else {
        core.info('Comment already exists, skipping');
      }
    }

    // Set outputs
    core.setOutput('size-label', sizeLabel);
    core.setOutput('lines-changed', totalChanges);

    core.info(`✅ Successfully processed PR #${prNumber}`);

  } catch (error) {
    core.setFailed(`Action failed: ${error.message}`);
  }
}

run();
Let’s break down the key parts:
Reading Inputs
const token = core.getInput('github-token', { required: true });
const smallThreshold = parseInt(core.getInput('small-threshold'));
The core.getInput() function reads values from the workflow file. Users can override defaults you set in action.yml.
Accessing GitHub Context
const octokit = github.getOctokit(token);
const context = github.context;
const pr = context.payload.pull_request;
The github.context object contains information about the workflow run, including the pull request payload with additions, deletions, and other metadata.
Creating Labels
await octokit.rest.issues.createLabel({
  owner,
  repo,
  name: labelName,
  color: config.color,
  description: config.description
});
We create labels if they don’t exist. The try-catch handles the case where they already exist (422 error).
Managing Labels
// Remove old labels
await octokit.rest.issues.removeLabel({...});

// Add new label
await octokit.rest.issues.addLabels({...});
We remove old size labels before adding the new one to keep things clean.
Setting Outputs
core.setOutput('size-label', sizeLabel);
core.setOutput('lines-changed', totalChanges);
Outputs allow other workflow steps to use your action’s results.
Step 4: Bundling Your Code
GitHub Actions doesn’t install node_modules for you. You need to bundle everything into a single file using @vercel/ncc:
npm run build
This creates dist/index.js containing your code and all dependencies. You must commit this file to your repository.
Add to .gitignore:
node_modules/
But don’t ignore dist/—GitHub needs it to run your action.
Step 5: Using Your Action
Create .github/workflows/pr-size-check.yml to test your action:
name: PR Size Check

on:
  pull_request:
    types: [opened, synchronize, reopened]

jobs:
  check-pr-size:
    runs-on: ubuntu-latest
    name: Check PR Size

    steps:
      - name: Check PR Size
        uses: ./  # Use local action for testing
        with:
          github-token: ${{ secrets.GITHUB_TOKEN }}
          small-threshold: 100
          medium-threshold: 300
          large-threshold: 600
          comment-on-large: true
For local testing:
uses: ./runs the action from the current repositoryPerfect for development and testing
For production use:
uses: AutomationDojo/[email protected]
Step 6: Versioning and Releases
Managing versions manually is tedious. Let’s automate it with Semantic Release.
Install Semantic Release:
npm install --save-dev semantic-release @semantic-release/changelog @semantic-release/git
Create .releaserc.yml:
branches:
  - main

plugins:
  - '@semantic-release/commit-analyzer'
  - '@semantic-release/release-notes-generator'
  - '@semantic-release/changelog'
  - '@semantic-release/npm'
  - - '@semantic-release/git'
    - assets:
        - CHANGELOG.md
        - package.json
        - package-lock.json
      message: 'chore(release): ${nextRelease.version} [skip ci]\n\n${nextRelease.notes}'
  - '@semantic-release/github'
Create .github/workflows/release.yml:
name: Release

on:
  push:
    branches:
      - main

jobs:
  release:
    runs-on: ubuntu-latest
    steps:
      - uses: actions/checkout@v4
        with:
          fetch-depth: 0
          persist-credentials: false

      - name: Setup Node.js
        uses: actions/setup-node@v4
        with:
          node-version: '20'

      - name: Install dependencies
        run: npm ci

      - name: Build
        run: npm run build

      - name: Release
        env:
          GITHUB_TOKEN: ${{ secrets.GITHUB_TOKEN }}
        run: npx semantic-release
Now use Conventional Commits format:
git commit -m "feat: add support for custom label colors"
git commit -m "fix: resolve issue with label removal"
git commit -m "docs: update README with examples"
When you push to main, Semantic Release:
Analyzes commits to determine version bump
Generates CHANGELOG.md
Creates a GitHub release
Updates package.json
Step 7: Writing Good Documentation
Your README should include:
# PR Size Checker

A GitHub Action that automatically labels PRs based on size.

## Usage

\`\`\`yaml
- uses: AutomationDojo/[email protected]
  with:
    github-token: ${{ secrets.GITHUB_TOKEN }}
    small-threshold: 100
\`\`\`

## Inputs

| Input | Description | Required | Default |
|-------|-------------|----------|---------|
| github-token | GitHub token | Yes | - |
| small-threshold | Max lines for small PR | No | 100 |

## Outputs

| Output | Description |
|--------|-------------|
| size-label | Applied label |
| lines-changed | Total lines changed |

## Example

\`\`\`yaml
- id: check-size
  uses: AutomationDojo/[email protected]
  with:
    github-token: ${{ secrets.GITHUB_TOKEN }}

- run: echo "Size: ${{ steps.check-size.outputs.size-label }}"
\`\`\`
Examples
You can see this action working on the repo:
Press enter or click to view image in full size
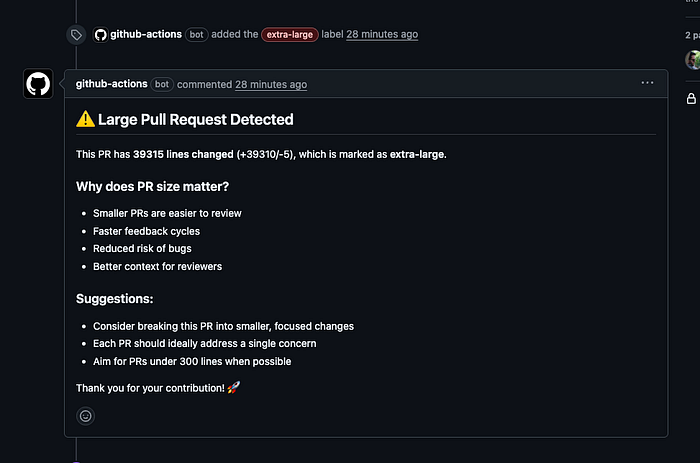
You can check the following pull request: https://github.com/AutomationDojo/github-custom-action-examples/pull/1
Best Practices I Learned
1. Always Bundle Your Code
Don’t rely on npm install during action execution. Bundle with ncc and commit dist/.
2. Use Semantic Versioning
Users should be able to pin to @v1 for automatic updates or @v1.1.0 for stability.
3. Validate Inputs Early
if (!context.payload.pull_request) {
  core.setFailed('This action only works on pull_request events');
  return;
}
4. Provide Useful Logging
core.info(`PR #${prNumber} has ${totalChanges} lines changed`);
Users can see this in their workflow logs for debugging.
5. Handle Errors Gracefully
try {
  // Create label
} catch (error) {
  if (error.status === 422) {
    core.info('Label already exists');
  } else {
    throw error;
  }
}
6. Make Everything Configurable
Don’t hardcode values. Use inputs with sensible defaults.
7. Test Locally First
Use uses: ./ in a workflow within your action's repository before publishing.
Common Pitfalls to Avoid
1. Forgetting to Build
Always run npm run build before committing. GitHub Actions runs dist/index.js, not your source code.
2. Not Committing dist/
The dist/ folder must be in your repository. Don't add it to .gitignore.
3. Wrong Node Version
Specify node20 in action.yml and use it consistently.
4. Missing Permissions
Ensure github-token has the required permissions. For most actions, ${{ secrets.GITHUB_TOKEN }} works fine.
5. Not Handling Edge Cases
What if the PR has 0 changes? What if labels already exist? Handle all scenarios.
Taking It Further
Now that you have a working action, consider:
Adding Tests:
npm install --save-dev jest @types/node
Local Testing with act:
brew install act
act pull_request
Multiple Actions in One Repo: Create subdirectories for different actions with their own action.yml files.
Publishing to Marketplace: Add topics to your repository and make it public. GitHub will automatically list it.
Real-World Impact
After implementing this action in my team:
Code reviews became 30% faster (small PRs are easier to review)
PR sizes decreased by 40% on average
Developers became more conscious of keeping changes focused
Onboarding new team members was easier (labels provide context)
Conclusion
Creating a GitHub Custom Action isn’t as daunting as it seems. With JavaScript and the GitHub Actions toolkit, you can automate almost any workflow task.
The key steps are:
Define your action’s metadata in
action.ymlWrite the logic using
@actions/coreand@actions/githubBundle your code with
@vercel/nccTest locally with
uses: ./Automate releases with Semantic Release
Document thoroughly
Start small, solve real problems, and iterate. Your future self (and your team) will thank you.
Resources
What automation challenges are you facing in your workflows? Share in the comments — I’d love to hear about them!